Thursday, 4 May 2017

Outside the Box Project Beta Work - Future Development

With more time to develop, we would like to translate our game to the Mobile market (conceptualised in Figure 1.).
All of our games mechanics have been designed for a PC, however everything the player can do in the game is centralised in the mouse; you want to collect the coins? Then you swipe over them with the mouse, you want to buy a defence or upgrade it? Click on the defence and select what you'd like to do.

Mechanically our gameplay wouldn't change if these mouse operations were swapped for a finger -tapping to purchase a defence, or swiping a finger to collect the coins etc.

Figure 1.
With out first level we can move forward using our first level as a template for future iteration, with it we'd make a tutorial level. We would progress the limited narrative by adding more types of enemies from Chess' The Monsters' mythos such as The Sneak or The Spy, each with their own characteristics in-game.

We'd also like to implement a boss level, were the Player would face minion Monsters and The Monarch, their queen. Other game types we could include are things like the Outpost variation I made of our game after our first presentation milestone back in December, the one we based our current level on.

That could then evolve into other game types, on where the Player has to keep control of the board, enemies would be able to take over Defences and those overtaken defences would change in appearance and start to attack the Player.

We would also like to implement a damage system for the Player's Defences, so The Monsters can fight back against the Player's Defences for more interesting dynamics in gameplay and strategy.

There is potential here to grow into something wonderful as a small, charming mobile game.

Outside the Box Project Beta Work - Game Banner


I had planned to design a poster/banner that both appear in the Main Menu and could be used as a big advertisement banner if we were to present our game at conventions.

Sadly I ran out of time to complete such a banner, but I did begin production of it, and I liked where it was going, it's just a shame I couldn't see it through to completion for our hand-in deadline.


Outside the Box Project Beta Work - Volume Option Coding


I wasn't able to get this working for our final hand-in of this project. However the principle I tried to apply in code was to provide a float value to the AudioListener component, which would then be influenced by where the slider is on it's bar/value.


Then in Unity's Editor, I simply had to give the UI Slider a reference to the OnGui void in the SceneCameraManager and set the starting value of the Slider to it's highest of 1 (lowest being 0).


I added an additional button to the pause menu named "Options" and that would switch off all the buttons visible above and turn on the Slider and a Button that would return the Player to the previous Pause Menu screen.


Outside the Box Project Beta Work - Damaged Enemy Appearances In-Game

One major thing we want to add for definite given more time to work on this project are damaged versions of The Monsters that will appear contextual to the numerical value of their Health bars. For example at MaxHealth (3) The Hunter will look fine, then at 2 HP (Health Points) The Hunter shall appear dirty (as seen in Figure 0.5), and at 1 HP The Hunter will nearly be toppling over from exhaustion.

Figure 0.5
I modelled The first damaged Hunter and tried to implement him before hand-in, however it didn't quite work out in time.

Figure 1.
I had to create a new Prefab for this to work, like how the Tower, Cannon and Magic Defence appear when they are upgraded the same principle applied here. The visualisations of The Hunter would be contained within an Empty GameObject and their SetActive Boolean would be made true or false based on The Hunter's current Health value, like how the Defences are upgrade, and with each defence having their own scripts governing their behaviour, as soon as they're turned on in scene, they run as they should. The Hunter, meanwhile, simply needs to look more beaten up, so the visualisations don't have scripts governing behaviour as their behaviour doesn't change just because they got hit by a Defence. All of this can be seen in Figure 1.


Figure 2.
So in the if statement as seen in Figure 2. I just checked the value of currentEnemyHealth in the referenced Manager Script and turned off and on the appropriate referenced visualisations.

Because I created a Enemy Damage Manager Script, it saved me from having to separate the health values for The Grunt and The Hunter and I could just reference the Enemy Health Manager on the gameObject the Damage Manager was attached to, which was now the empty GameObject that contained The Hunter visualisations, as I had also moved all the scripts from the one Hunter model to this Hunter Container so that all changes would happen to all versions of The Hunter.

Such as when The Hunter's health reached 0 the container and all the visualisations would be destroyed, rather than the one version.

However the problems I faced were time related. By moving The Hunter models into a container I had to spend time to reposition the models so that they would appear correct when spawned and follow the waypoints correctly. I would have also needed to model the other damaged Hunter and the damaged versions of The Grunt, and texture them, then implement them in game, and I just didn't have the time to sort this out.

So, I know I can do it, I've shown that here, but I didn't have time to complete it and fully implement this, hence why the damaged appearances won't be seen in our hand-in game build.

Outside the Box Project Beta Work - Project Update, Milestone 03, Game Pitch Feedback

The feedback we received from our mock game pitch came across as optimistic, surprised and constructive. It felt as though our tutors and guest didn't expect the quality of the work we produced for this presentation and our game (despite complete self-doubt on our part) and were pleasantly surprised and pleased at what we had to show for our work.

In fact the only feedback we received to make improvements for Project Beta's hand-in (as of writing this) was this list:

- Scale the Environment to make it a little Bigger to increase enemy paths
- Scale the Defences to be Bigger 
- Reduce Size of some UI Elements 
- Make Player Health more Obvious 
- Reduce the Force of the Coin Eruption 

There wasn't criticism for design choices, gameplay, mechanics etc. just simple tweaks to our game to help improve Player experience, which we gladly took on board. 

Original Feedback Update Attempt 

I originally attempted to follow the advice of our tutor's and guest by increasing the scale of the environment to provide the player more space to breath and to make the game environment appear larger. However this caused scaling issues that, when rectified, simply made the game board look like it had done prior to any change. It also caused havoc with the count down timer and the range of the Defences. All of which was just a bit too much for me to handle fixing with only just over a week until hand-in

Milestone Pitch Version

Post Milestone Feedback Update (Path Increased and UI Shrunk)

Instead, I tried playing a trick with the scenery to make it appear as though the paths are bigger and the Player has more time to react at the start, however all I did was move the tree line back, moved the enemy spawn points back with the tree line and moved the Player Base back a little. This gave created a larger path without the struggle of all those game and balance fixes from y original attempt.

The only changes I need to make was to make sure the waypoints the enemies followed still reached the Player Base to harm the Player and that the timer was still in time with the game. To my surprise I actually had to reduce the time limit from 2 1/2 minutes to just 2 minutes to keep the game tense, but not impossible with the time limit.

I also repositioned the Build Spots so that they were more relevant to the path's the enemies would take to reach the Base. As the enemies follow the dirt path on the Ground's texture.

With this repositioning I've also given The Grunt's a couple more waypoints for them to follow to make their path more in line with the more straight dirt path on the Ground's texture. 

Milestone Pitch Version

Post Milestone Feedback Update (Defence Sizes)

If you visualise that the standard sizes of a 3D model are 1, 1, 1 on X, Y and Z then these are the changes I've made to the scaling of the Defences in-game post feedback


Increased size of Towers by 30% (1.3)
Increased size of Magic by 60% (1.6)
Increased size of BubbleWrap by 10% (1.1)
Increased size of Candle by 50% (1.5)
Increased size of Cannons by 30% (1.3)

Milestone Pitch Version

Post Milestone Feedback Update (Upgrade UI Size)

Milestone Pitch Version

Post Milestone Feedback Update (Lack of Money Feedback Shrunk)
Following those 3D model changes I then scaled some the UI on screen down a bit, as per feedback, this reduced the amount of the screen each UI piece covered during gameplay and the game was better for it, as Player's would get frustrated by the fact that UI was blocking their mouse from interacting with the Defences and coins that needed the Player's urgent attention to survive and play.


Outside the Box Project Beta Work - Enemy Wave Counter

As there was no Round or indication of the Waves of enemies spawning I decided to code a counter for how many enemies would be spawning and for a parallel number to be reduced as the enemies are killed to showcase the Player's progress. 

Figure 1.

Figure 2.
To do this I simply gained access to the list that informed the game of the number of enemies that would be spawning each wave (for example 5 Grunt's in wave 1 and 15 in wave 2). This list is within the Spawn Enemy script. Then I had to convert that numerical value from an int/float to a String (int's and float's being numbers and String's are words/letters).

Figure 3.

Figure 4.
The GruntChecker and the HunterChecker were scripts placed on the prefabs of The Grunt and Hunter respectively. All they had to manage was reference the numerical value in the EnemyCountScript that would be reduced when a contextual enemy was killed (as there is a counter for both The Grunt's in scene and The Hunter's in scene) and then using OnDestroy (when the gameObject this script is attached to is destroyed) reduced that value by 1, short hand is --

Figure 5.
Figure 5. is how the counter looks in scene.

Outside the Box Project Beta Work - Game Build Thumbnail

To make our game a little more professional, like with the opening team credits, I decided to create a thumbnail/game icon for our game that would appear on the dashboard to represent the Application/EXE. Figure 1. is that icon.
Figure 1.

I like the design, it's meant to be the one toy our child in-game owns that inspired the entire design and their imagination to create this little pocket world, draped over the side of the box it's contained in after a session of playing with the toy when the kid has put it away.

The icon itself is only 256x256 in pixels, this is because most icons are of this size, as my icon scales well with other game icons I have on my own dashboard. As well as the fact that Unity has set sizes it will accept when trying to implement a game icon in the Editor (as seen in Figure 3.)

Figure 2.

Figure 3.


Outside the Box Project Beta Work - Can Upgrade Defences Feedback

After some game testing from others in the class one of the most important pieces of feedback I received was to include some form of indication/feedback for the Player on when the Defences could be upgraded.

So I set to work making a script that managed feedback when the Defences could be upgrade I.e. when the Player had enough money to upgrade.


Figure 1.

All the FeedbackManager did was get a reference to the UpgradeComponent in the Inspector in Unity and in the if statement checked if a Boolean in the UpgradeComponent script had been set to True or False, if False the 3D model that represents the feedback would be switched off and of the Boolean was True then the feedback model would be turned on to be made visible.


Figure 2.

Figure 2.'s UpgradeComponent script was where the Player's money was checked against the cost of upgrading Defences, and if the Player had enough money then the CanUpgrade Boolean would be set to True, influencing the FeedbackManager.

Figure 3.
One can see in Figure 3. how this feedback appeared in-game. If the green ball is visible then the Player has enough money to upgrade that Defence.

Outside the Box Project Beta Work - Texturing Particle Systems


There are 3 instances in the game that I felt necessitated  a particle system to provide contextual feedback to the Player, those 3 instances were:

- Enemies moving
- Cannon Fire
- Candle Fire

To do this I added a particle system where appropriate (behind and toward the base of The Grunt, at the tip of the barrel of the Cannons and on the Candle wick). After which I modified the 3 versions Emissions so that they emitted contextually, such as the candle fire emitting constantly but with a low life span so as to reduce the height of the flame, as a candle would have a small flame.

Then it was just a case of applying appropriate textures to the separate particle systems (the textures themselves created by Chess Pearson). At first I believed it would be as simple as applying an image to a UI piece, which requires you changing the "Texture Type" of the image to "Sprite (2D and UI)" and then dragging the texture into the "Renderer" -> "Material" section (As seen in Figure 2.).

Figure 1.

I was wrong however, and was in fact required to create a Material that one would apply to a 3D model and supply the Material with the appropriate texture, as seen in Figure 1.
Then, there is a drop down list on the Material that allows you to change the "Shader" type. This needed to be changed to "Particles/Alpha Blended".

Figure 2.

Following this I was able to apply the Textured Material to the "Renderer" -> "Materials" option on the Particle Effects appropriate to the Particle System I was editing, Dirt/Dust to The Grunt, Flame to the Candle and Smoke to the Cannons.

Outside the Box Project Beta Work - Game Start Narrative


Since our game is based on a child having built everything on the board, or at least is using household items to play with imagination the narrative we want to convey through both an opening comic panel and the clock countdown time is that the kid has a limited time to play before needed to leave, hence why there is a time limit lose condition.

Narratively we want this to be a parent setting up the clock on the board telling the kid they have this much time to play (this would be shown through the opening comic). Why does the kid have a time limit? Well because Breakfast/Lunch/Dinner is almost done. So I wanted to code a thing where, once the Player hits the play game button a script would activate (see Figure 1.) that Play's a sound of a motherly voice calling out "Dinner time!" and an eager child response of "ok".

Figure 1.

The way I tried to code this was that the AudioSource would play on the public void GameStart (which would be called on the press of the "Play Game" button). Then a count down of 3 seconds would appear on screen. I eventually decided against this simply because I couldn't find the right child respond sound online and didn't have time to book a session in the recording booth at university in relation to how much else I had to do at the time.

I realise now that this wouldn't have worked as I liked anyway, as the StartCountDownText would cycle through super fast rather than one per second as the void would run via the frame rate, and at a standard of 60 Frames Per Second this text would blitz by.

Plus I should have used a Coroutine to WaitForSeconds to control when each number would appear on screen and then subsequently starting the Game through Time.timeScale.

Outside the Box Project Beta Work - Polishing Enemy Movement Across the Board

Like how Tags can be used in code to control interactions between mechanics in games, all models have Layers set to a "Default" Layer which can control Physics interactions.

One of the problems that made our game appear a bit jank (un professional) was that our Enemies would "bounce" and freak out on the spot as they moved between waypoints. The problem was that the Layers of all 3D models in Unity are automatically set to "Default" and that meant the base of the models of the Enemies were interacting with the Ground model.

So to fix this I created a brand new Layer in the same way one would create a new Tag entitled "Enemy"and set the Enemy Prefab's Layer to "Enemy" (as seen in Figure's 1. and 2.).

Figure 1.

Figure 2.

Then one would go Edit > Project Settings > Physics. And because there is a newly created Layer, there are new tick boxes in the Physics Project Settings. By un-ticking Layer boxes that intersect, all models with the 2 appropriate Layers attached to them will no longer interact with each other in the scene. So by un-ticking the box that intersects between the "Enemy" Layer and the "Default" Layer, our enemies are no longer interacting with the Ground model, which has the "Default" Layer attached (as can be seen in Figure 3.).

I used this method to prevent some issues with the Bullets as well. As they would collide with the Defence models in the scene if the Defence model was in the way of the Bullet reaching the Enemies, and would fly off the screen, rather than colliding and causing damage like they should. 

So I also created a new Layer for the Bullets, like with the Enemies, and un-ticked the intersecting box with the Defences to prevent the Bullet's and Defence interacting with each other, which in turn prevented the Bullet's from flying off screen; something they have no reason to do in the context of the game.

Figure 3.

Outside the Box Project Beta Work - Toxic Defence Behaviour Update/Fix

The trouble with the Toxic Defence Behaviour script was that, although enemy health was decreasing whilst colliding with the defence and the defence's health was decreasing concurrently. When the Toxic defence was destroyed there was no way for the player to make use of the build spot left behind thereby rendering a defensive position useless.


ToxicBehaviour Script 01

ToxicBehaviour Script 02

The change to the ToxicBehaviour script from before, is that now in Update the Toxic Defence is getting a reference to the BuildDefences script and making sure it knows that when the Toxic Defence is destroyed/gone. That the Boolean that sets to True when a Defence has been built to prevent further interaction with the relevant build spot is now set to False as the Toxic Defence is gone.

 buildDefencesScript = BuildSpots(CurrentBuildSpot).GetComponent<BuildDefences>();

What this line of code does is search the BuildSpots list and finds the CurrentBuildSpot number and then gets the BuildDefences script component from the numbered Build Spot.

BuildDefences Script 01
As the BuildDefences script now requires a reference to the ToxicBehaviour script from Start, there is always an active Toxic Defence in Unity, but off screen as it not meant to be interacted with, just to provide scripting references.

BuildDefences Script 02
Spot Number is a public int (so that it can be changed in the inspector) that CurrentBuildSpot is set to every time a Toxic Defence is built.

What is essentially happening is we are getting a reference to the build spot we have just built the toxic defence on through this Spot number. We know we have built a toxic defence on the build spot closest to the Player base (for example) because the script has found the Spot Number that is on the build spot closest to the Player base. This is then how we can get a reference to just this 1 build spot and re-enable it's collider when the toxic defence is destroyed, thereby allowing the Player to build on that build spot again.


Outside the Box Project Beta Work - Coin-PickUp Feedback (Text + Updating Sound Code)

To provide feedback to the Player on how much money they receive from collecting the coins I decided to create a UI pop-up that displayed the numerical value the coins provide the Player (as seen in Figure 4.)


Figure 1.

Figure 2.
Figure 2. is the PopUpTextManager. This script controls where the UI will be instantiated; as a UI element the Text needs to be instantiated as a child of the Canvas, otherwise they won't appear on screen.

Figure 3.
Figure 3. is the older script I made, MoneyPickUp, which controls what happens to the coins when they are Moused over, such as adding money to the Player's total funds. So this is where we call the PopUpTextManager to run the functions within that script.

Figure 4.

Updated Sound Feedback Production:

I used to generate the sound for the coins by instantiating a prefab which contained the Audio Source component when the coins where moused over. As can be seen in Figure . however this was causing issue in the editor. Unity refused to destroy the clones of the sound prefab and they cluttered the inspector. Now due to the length of our level's gameplay, I knew that this wouldn't cause an issue on performance, and I was reinforced in my belief after a few test builds.


However in my latest test build (17/04/2017) I could no longer "pick up" the coins. They spawned, the text feedback appeared but they would not give the player money, nor generate a sound or destroy themselves once moused over as can be seen in Figure .


I had a hypothesis as to how to fix this, and that was to clean up my original code for generating the coin pick-up sound. So instead the inspector contains an empty GameObject which itself contains the Audio Source component which contains the coin pick-up sound. in the code I removed the instantiate and the Destroy (prefab, delayed by seconds) lines and replaced them with a void Start method which went and found the empty GameObject containing the Audio Source component by name, and then used GetComponent to get the Audio Source component. Then I played it when appropriate, which is in the OnMouseOver function.

This cleared up the stockpile of red errors Unity spat at me informing me that the prefab could not be destroyed and with another test build the coins work as they should both in Unity and in the game build.


Outside the Box Project Beta Work - Implementing Environment Grass

I felt something was missing from our game that was making our game feel a little less professional, and I came to the conclusion that it was because the environment felt a little bare. We had the ground and the tree's but that was it beyond the Player's defences. So I decided I wanted to add more foliage to the scene, and a friend of mine in class showed me exactly how to implement grass to the scene.

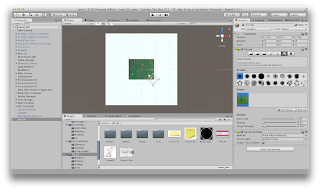
Figure 1.
To do this you would go GameObject > 3D Object > Terrain. This creates the large white square seen in Figure 1. From here in the Terrain component of Terrain you can select the icon that looks like flowers > Edit Details > Add Grass Texture and a new box opens that allows you to implement a UI piece and change other details of how this texture will appear.
Because you are essentially "painting" on 2D grass images that orientate themselves with the camera to appear 3D.

Figure 2.

Figure 3.

Figure 4.
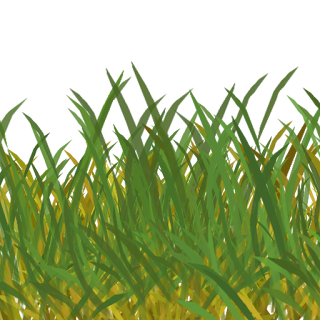
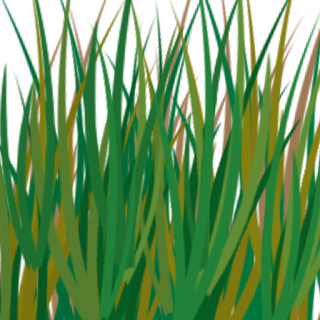
Figures 2, 3 and 4. were the textures I created in Photoshop, each progressively updated after receiving feedback from my teammate Chess. Figure 4. was the texture we settled on to add to the game. We came to this conclusion as Figure 4. stands out more as clear cut grass, whereas Figure's 2 and 3. just appeared like masses of green on top of an already green ground texture and it made it hard to distinguish Figure's 2 and 3. s anything more than just globs of colour as opposed to blades of grass like Figure 4. came out.

Figure 5.
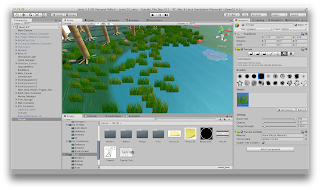
With the texture decided on, one simply "paints" the grass within the grey space of the Terrain object.